Do You Need an Audio Interface to Record Vocals, Guitar, Bass or Anything Else?

Sometimes when Musicians HQ mentions gear, we’ll include our affiliate link & may earn a commission at no cost to you. This doesn’t impact the products we mention.
Recording audio is something that both professional musicians and at-home enthusiasts can participate in. It is a process that seems complex to those starting out, and quite a few components can be involved. Many people wonder: what exactly do you need to record audio?
Do you need an audio interface to record anything? While you can record basic audio on anything with a sound card, like a cell phone or a computer, you’ll need an audio interface to make good, professional recordings.
In this article, we’re going to walk you through everything you need to know about recording and audio interfaces. We’ll discuss what audio interfaces actually are, why you need an audio interface to record good quality audio, different types of audio interfaces, and even how to use an audio interface to record audio.
Making Music Without An Audio Interface
Later in this article, I will explain in great detail why audio interfaces are great and why I couldn’t live without one in my home studio. But that doesn’t mean you can’t record music without one. Technology has come a long way in recent years and you can get a decent recording with very little equipment.
Option 1: Use an adapter to plug directly in to your computer.
It is possible to pick up a simple adapter or cable which will allow you to plug directly from a guitar amp or keyboard, for example, into your computer. This will allow you to record to a DAW such as Audacity on PC or Garageband which comes pre-installed on most Apple devices.

![]()
or

![]()
The problem with this technique is that you are relying on the sound card built into your computer or laptop. And unless you custom built your laptop it is unlikely that the soundcard was designed specifically for audio production and so will have limitations in terms of quality. You could upgrade this, but for the same money, you might as well buy an audio interface that has a specialist built-in soundcard, designed for this function.
Option 2: Use a USB microphone
There are now a vast array of USB microphones available which you can quickly plug into your laptop and start recording. You could use it to record virtually any ‘live’ sound from vocals to a guitar amp to a violin.
The sound quality will probably be quite good but for recording electronic instruments such as guitars or synths you are also reliant on having a good quality amp and also a room with decent acoustics so you don’t just end up with loads of unwanted echo on your recordings.

![]()
A USB microphone is fine if you just want to record a few vocals or maybe do some podcasting, but if you want to get serious about making music a XLR microphone plugged into an audio interface gives you much more flexibility. I wrote a full article to explain why here.
Option 3: Use ‘Virtual’ Instruments
Traditionally when you think of a recording studio, you might imagine a full band with drums, guitars and vocalists, but the reality of modern recording is you can create entire songs with just a laptop or computer!
Virtual instruments are either composed of samples of real instrument recordings, or they could be entirely computer-generated. Many pieces of (even free) software such as Garageband come pre-loaded with loads of these instrument sounds and drum loops so you can compose an entire song even on your iPhone! Check out the video below of someone using Garageband to recreate a pretty accurate version of Hold The Line by Toto.
But this isn’t just a gimmick. Many professional producers, particularly in dance music genres, produce entire albums on just a computer with no external instruments.
A MIDI keyboard will plug into your computer or laptop via a USB connection and you can play these sounds in a way that almost feels like the real thing.
So if you just want to make music there is no reason why you have to buy an audio interface. However, if you want to get serious or record any external instruments here is a definitive guide to why you should consider buying one.
Why You Should Buy an Audio Interface
To help understand why you need an audio interface in order to record good, professional-quality audio, it’s important to know more about audio interfaces themselves. What are they? What can they do? What types are out there?
In this section, we’re going to answer all of those questions and more. Let’s start!
Terms You Should Know
Throughout this article and as we discuss audio interfaces, we may use some terms you aren’t totally familiar with.
To make sure you get the most out of your reading and to make sure you know why audio interfaces are so important, it’s very helpful to know some of the common terminologies.
Terms you should know and be familiar with as we discuss audio interfaces are:
- Ins and Outs: Ins and outs are also called inputs and outputs. These are where things are plugged into the audio interface (inputs) and also where the sound travels to (outputs).
- MIDI: MIDI stands for Musical Instrument Digital Interface. MIDI allows electronic and digital instruments and tools to connect with each other.
- Latency: Latency refers to the noticeable delay between the actual sound and its playback in speakers or headphones.
- Drivers: Drivers are pieces of software that allow an audio interface to communicate with a computer.
- Direct Monitoring: Direct monitoring is a feature of audio interfaces in which you can hear the analog audio that’s being plugged directly into the audio interface, rather than after the audio goes through the computer and comes back. Direct monitoring can reduce and eliminate latency.
What Are Audio Interfaces?
You may be surprised to hear that audio interfaces are more common than you think. The sound cards in your cell phone, tablet, or computer are all kinds of audio interfaces. But what actually are audio interfaces?
Audio interfaces are essentially the hardware you need to get sound in and out of your computer or other devices. They convert audio signals from various musical instruments and turn them into digital signals that your computer can understand.
Audio interfaces are also essentially the same thing as the sound cards in your phone or computer that we just discussed. They do the same basic job: getting audio in and out of your device.
However, we can think of audio interfaces as external sound cards. Audio interfaces aren’t built into devices; they’re an external hardware component that can work with those devices (most commonly computers).
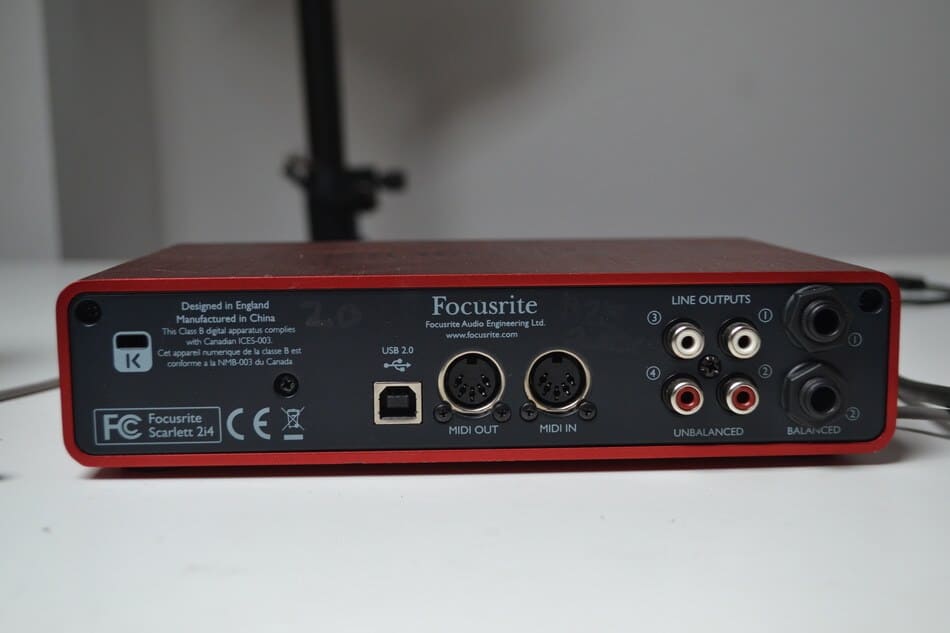
Audio interfaces generally look like a rectangular box with various dials, knobs and buttons on the outside. You’ve probably seen them before, maybe even without realizing. Below is a picture of the one of the audio interfaces I have used for a long time, the Focusrite Scarlett 2i4. You can see the various inputs on the front and outputs on the back.

The “box” of the audio interface can then be connected to a desktop or laptop computer via a USB or thunderbolt port (depending on what type of computer you’ve got). Some audio interfaces can even be connected to mobile devices with an additional adapter.
Why Else Are They Useful?
You read that audio interfaces are a type of hardware that gets audio in and out of a device. But what does that entail? We can definitely expand further on what audio interfaces actually do.
Sound Quality
Audio interfaces help produce a more professional sound from a computer than a regular sound card would be able to do.
Computer sound cards aren’t built specifically for music production, they are built to serve all sorts of functions. An audio interface is built specifically for that purpose and so the sound card is of much higher quality.
Audio interfaces also have built-in pre-amps to improve the quality and tone of things such as vocals from a microphone. And many have additional functions such as ‘phantom power’ which is needed to provide an extra power boost for certain microphone types.

Reducing Latency
When I first started my musical journey I tried to record directly from my guitar amp to my computer microphone slot. This is possible as the computer has a built-in sound card, however because the hardware is not built for this function it caused latency. Latency is a gap in time between when you play a note and when the computer picks it up. This could be as little as a second but it makes it virtually impossible to record anything.
When I bought an audio interface this problem disappeared! Obviously you still need to have a decent quality laptop or computer too, you can check out my guide on what to get here.
Multiple Inputs and outputs
Not only do audio interfaces improve the sonic capabilities of a computer, but they also expand the inputs and outputs available to you. This gives you the option of recording multiple instruments at once, perhaps keyboard and vocals. It also allows you to record something such as a synth which outputs in stereo.
Most audio interfaces will allow you to connect 1/4 inch instrument cables or XLR microphone cables directly without having to worry about buying various adapters. They also have outputs direct to your monitor speakers, minimizing the number of things you need to try and plug into your laptop or computer.
You can record electric guitar or bass without an amp!
One often overlooked benefit of an audio interface is that it allows you to record an electric guitar or bass without the need for an amplifier. This is because audio interfaces have pre-amps within them which can amplify the signal.
When I started out I just had my laptop and some headphones set up in the corner of my student flat. I didn’t have the space for a guitar and bass amp in there too. But an audio interface allowed me to record guitar directly to my laptop using an amp simulator and my DAW. Ok so it’s no substitute for a professional recording of an amp with a microphone, but it will do a pretty good job for what most people need.
The Anatomy of an Audio Interface
Previously, we briefly mentioned that an external audio interface resembles a box. But what else is an audio interface made up of? What components does it have? Let’s discuss the parts audio interfaces have and what they do.
Line Inputs
Like we’ve been discussing, audio interfaces have line inputs for you to connect other devices. Audio interfaces may have line inputs on the front or the back. These usually include inputs which can take both XLR cables (typical microphone cables) or 1/4 inch cables (typical guitar leads).

Output Controls
With inputs comes outputs. Most audio interfaces have output controls so you can control the output to your monitor right on the audio interface. This is very handy allowing you to quickly adjust volume levels and gain levels using the knobs without having to do so via your computer.

Meters
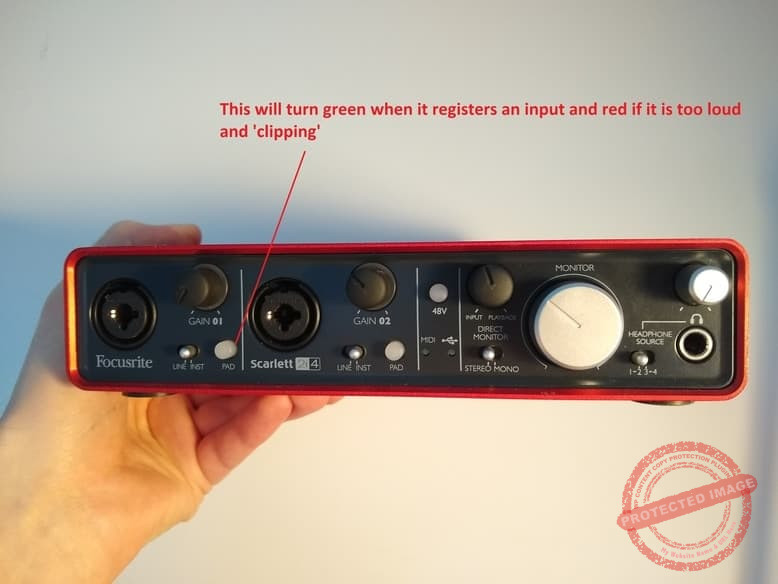
Not all audio interfaces have meters on the actual interface itself, but a lot of them do, and they’re really useful to have. Meters allow you to see your signal levels.
This is more typical of a mixer than a basic audio interface. If you want to learn the difference check out this other article.
Some will just have very basic lights like the Focusrite which turns green when it registers an input and red if it is too loud which is a bit of a warning as it might cause ‘clipping’ to occur.
Computer Connector
When it comes to audio interfaces, computer connectors are really exactly what they sound like. Computer connectors are simply the point of connection between your audio interface and your computer, whether it be via USB, thunderbolt, FireWire, or something else.

Line Outputs
Line outputs allow you to directly output from the audio interface to your monitor speakers. This allows you to either monitor the direct sound from your microphone or instruments before it enters the computer, and it also allows you to output the sound once it has been manipulated by the computer.
You will see in this example you have a couple of options. Balanced and unbalanced. I won’t go into detail on what these mean here as I just wrote a detailed article on the subject here however if you have good quality speakers you are going to want to use the ‘balanced’ outputs.

Why You Need an Audio Interface
While you technically don’t need an audio interface to record anything, you’ll need an audio interface to record professional, high-quality sound. That can include recording instruments, voices, or other types of audio.
Sure, you’ve got a sound card in your cell phone and a sound card in your computer. You can record basic audio with those, but the basic sound cards in these devices fall short in a lot of ways, especially when compared with external audio interfaces.
The sound card in a phone or computer doesn’t have the appropriate connections for recording music or other audio (especially at a high quality level).
For example, in your computer, you may only have a stereo headphone or speaker output. But what will you do when you need an input for your mic? How about an input for your guitar? What will you do when you need to monitor your recording and sound editing?
Well, the answer is pretty straightforward: you need an audio interface.
In summary, some of the benefits of audio interfaces and some of the reasons you need an audio interface for recording are:
- Audio interfaces have more ins and outs; they have more ways to get sound into and out of your computer.
- Audio interfaces don’t have the jitters, latency or noise that’s common with standard sound cards, like the ones in a phone or computer.
- Audio interfaces can connect to a wide range of recording and playing equipment.
- Audio interfaces generally have much higher quality audio than standard sound cards.
- Audio interfaces can work faster than standard sound cards.
- Most audio interfaces offer MIDI inputs and outputs so you can record and play software-based instruments and plugins.
- Audio interfaces can have and use direct monitoring to reduce and eliminate latency.
- You can use professional grade microphones with an audio interface without adapters (which are mostly better than USB microphones).
As you can see, getting and using an audio interface for recording is pretty important!
Things to Consider Before Purchasing an Audio Interface
Hopefully, we’ve convinced you that if you plan on doing any serious or professional audio recording, you’re going to need to get an audio interface.
Now that you know just how useful and important audio interfaces are, we can prepare you for purchasing your own!
As with just about anything, especially when it comes to technology, there are some things you’ll want to consider before purchasing an audio interface. We’re going to walk you through them.
Considerations: An Overview
List lovers, this one’s for you. Here’s an overview of the things you’ll want to take into consideration before getting your own audio interface, which we’ll discuss in depth later on.
- What inputs and outputs do I need?
- What kind of computer (or other devices) connectivity do I need?
- What level of sound quality am I looking for?
- What am I looking to spend?
Now, let’s check out these considerations in-depth to make sure you’ll be making the right audio interface purchase.
What Inputs and Outputs Do I Need?
As we discussed previously, inputs and outputs are one of the huge benefits that come with getting and using an audio interface. Therefore, one of the most important things to take into consideration before buying an audio interface is what inputs and outputs you need.
There are tons of different input and output options available when it comes to audio interfaces; some audio interfaces are very simple, with two-channel desktop interfaces and minimal inputs and outputs that can only record one to two signals at once.
Then, on the other end of the spectrum, there are more advanced audio interfaces that can handle anywhere from dozens to hundreds of signals and inputs at the same time. Crazy, right?
Consider this: if you’re a singer-songwriter who only wants to record voice audio through a microphone or two, an audio interface with two inputs and outputs could be great for you.
However, on the other hand, if you’re a music producer or an artist who wants to connect external gear and record multiple audio sources like drums, guitars, and other machines, you’re going to need an audio interface with more inputs and outputs.
Before you buy an audio interface, make a list of all the things you plan on recording or using with your audio interface. Add up how many connections you’re going to need to use that gear with your audio interface and try to find an interface that can support your needs. Or whether something like a USB mixer might be more appropriate.
What Kind of Device Connectivity Do I Need?
Audio interfaces need to be connected to a computer or other device, so another one of the most important things you need to consider before buying an audio interface is what type of device connectivity you need.
What kind of device do you plan on using with your audio interface? Are you a PC user? Do you have a Mac? Are you planning on using your audio interface with a tablet?
These are all questions you need to ask yourself before you purchase your audio interface, because it’s imperative that your audio interface can connect with your device(s).
Audio interfaces have several different types of connectivity to devices. The most common connection types between audio interfaces and other devices are:
- USB: USB ports can be found on almost all new devices, like PC computers, Mac Laptops, and Mac desktops. Beware that some of the newer Macs may not have a USB port, and you may need to get an adapter if you have an audio interface that connects via USB.
- Thunderbolt: Thunderbolt is the high-bandwidth technology that’s currently found on newer Mac computers like we just discussed. Some PCs may have Thunderbolt option cards as well.
- FireWire: FireWire is primarily found on Mac gear and other Apple products. PC users can also use FireWire if they get an expansion card in their computer.
- PCIe: PCIe means PCI Express. These connections are mostly found in desktop computers. They get plugged directly into the computer motherboard.
Other things to consider when it comes to connectivity are speed and latency. Some connections have less latency and more speed than others.
For example, Thunderbolt connections offer very low latency and very high-speed data transfer. Those who are very serious about recording and have demanding recording projects may want to consider using a Thunderbolt connection over another connection.
To be honest, most of the time you will be fine with a USB connection. That will allow you to connect to most types of laptop or computer and you don’t need to worry if you switch between PC or MAC.
What Level of Sound Quality Am I Looking For?
Sound quality is another important factor when it comes to considering which audio interface to buy. It’s important to keep in mind that with audio interfaces, those that have the best quality components (and therefore the best sound quality) will have higher price tags.
There are different components of audio interfaces that affect sound quality, like bit depth, converter quality, and sample rate.
Bit Depth
When it comes to bit depth, you need to keep in mind that digital recording takes your analog audio and converts it to bits and bytes. The higher the number of bits, the higher the quality of sound (to put it very, very simply).
So, for example, a 16-bit standard may produce some sounds in the background and may not be as high quality as, say, 24-bit recording. 24-bit recording will produce smoother, more professional results that have less (or no) sound in the background.
Converter Quality
Converters may be A/D or D/A, meaning either analog to digital or digital to analog. Converters are the devices that take sound and convert them into digital data, then take the digital data from the computer and convert it to audio output.
Therefore, you’ll want to get an audio interface with high converter quality. That way, your recordings will sound much better when they come out of the computer.
Sample Rate
Sample rates are necessarily how much audio and data your gear captures in each moment. So, in theory, higher sample rates can capture more information and turn it into a more satisfying sound.
If you’re looking to produce high-quality, professional audio, a higher sample rate in an audio interface may really benefit you.
What Am I Looking to Spend?
This consideration is a big one for just about anyone. How much are you looking to spend on an audio interface?
Your budget may, unfortunately, limit the number of options you can get in an audio interface. Don’t fret, though; you can still get great quality audio interfaces that won’t break the bank.
Audio interfaces have an extensive range of cost, just like they have a large range of features and compatibility. Audio interfaces can cost anywhere from around $20 at the most basic to around $7,000 at the most complex.
Budget and cost are another reason it’s so important to analyze and consider what you need from an audio interface before you buy one. Are you able to afford all the components you need? Can you spend less on an audio interface because you don’t need one that’s super complex?
Make sure to assess your needs and wants in an audio interface before going to purchase one.
How to Set Up An Audio Interface
Maybe you ended up buying your own audio interface, or maybe you’re just looking for information on how to set up and use one before taking out your credit card to make the purchase.
Either way, we’re going to walk you through some of the basic steps to setting up and using an audio interface.
Keep in mind that some of these instructions may vary depending on which audio interface you have and whom it was made by. Manufacturer instructions are always the most accurate and often the most helpful!
Time to discuss one of the most important parts of getting and using an audio interface: setting it up! Setup is crucial in the process of using your audio interface, and it pays to set your audio interface up correctly. Let’s get into the details.
Overview of Steps for Setting Up an Audio Interface
Again, list lovers, this ones for you. Here’s a list of the basic steps to setting up an audio interface:
- Download and install the latest driver for your audio interface
- Get out your audio interface and its cords
- Plug in the power cord to a power outlet
- Plug in your audio interface directly to your device or computer’s port
- Choose your audio interface in your computer’s operating system
- Select your audio interface in your digital audio workstation (DAW) software
- Choose which input to use from your interface
Step 1: Download and Install the Latest Driver for Your Audio Interface
Before starting to actually handle your audio interface, you’ll want to make sure you have downloaded and installed the latest driver for it.
There may be different drivers for different types of computers; for example, the latest driver for audio interfaces on Macs is a Core Audio driver.
Step 2: Get Out Your Audio Interface and Its Cords
Time for the fun part: actually unboxing your audio interface and getting out its cords and components. Look to see which cord is the power cord for the audio interface, or the cord that plugs into an external power source.
Additionally, look for your cord that connects the audio interface to the computer. These will both be important in the next few steps.
Step 3: Plug in the Power Cord if it Has One
This might go without saying, but you’d be surprised how many people forget that audio interfaces may need an external power source and therefore, need to be plugged into one.
Get out your power cord as mentioned before and plug in both parts; your power cord will need to be plugged into both your audio interface and a wall outlet or other power source. Not too complicated, right?
Step 4: Plug in Your Audio Interface to Your Device
Now it’s time to plug in your audio interface to the device you plan on using it with. This is most often a computer, although you’ve learned by now that audio interfaces can be used with other devices as well.
It’s recommended to plug your audio interface directly into your computer or another device rather than a USB hub. So, if you have to sacrifice a port, we’re sorry, but you’ll be happy you did!
Step 5: Choose Your Audio Interface in Your Operating System
Next, you need to find your audio settings in your operating system as a whole. This is in whatever device you’re using, which is most often (as we’ve mentioned) a computer.
To find your audio interface settings in a Windows PC, you can generally navigate to the Start Menu > Control Panel > Hardware & Sound > Sound. Then you’ll need to look at the Playback and Recording tabs. You should see your audio interface and its different components there.
To find your audio interface settings in a Mac, you can generally navigate to the top left of your menu bar and click the Apple logo. Then click System Preferences > Sound. Then you’ll need to look at the Output and Input tabs. You should, again, see your audio interface and its different components there.
You might have to adjust and change these settings pretty frequently, so try to remember how to navigate to them. It’ll come in handy!
Step 6: Select Your Audio Interface in Your Digital Audio Workstation Software
When you’re recording and playing with audio, it’s more than likely that you have a digital audio workstation (DAW) software. Some of these softwares include Ableton, FL Studio, Garage Band, and Logic Pro X, just to name a few.
To select your audio interface in your DAW software, open up your DAW software and navigate to the settings section. Typically, you will find a menu that specifies which device connected to your computer will be used for the output and input devices.
In this case, it’s going to be your audio interface. Select the name of your audio interface to make sure it’s responsible for your inputs and outputs in your DAW software while you’re recording.
Step 7: Choose Which Input to Use from Your Audio Interface
If you chose an audio interface with multiple input capabilities, you’re probably going to be using different types of inputs, like microphones, MIDIs, drummers, guitars, basses, or whatever else you connect to your audio interface.
In order to use a certain input from your audio interface (and therefore record audio with/from it), you need to choose which input to use. First, you’ll want to set up an audio track. Then, you’ll choose whichever input you want to use for recording.
Make sure to pay attention to the numbers of your inputs and which input is placed where. That may come in handy depending on the DAW software you’re using. Some label what the input actually is (mic, drummer, etc.) but some only list the input number (Input 1, Input 2, etc.).
After that, you just need to repeat these steps (mostly just steps 5 through 7) as many times as necessary.
Your audio interface is now set up! Congratulations!